Back up Home Assistant to Azure
Protect your Home Assistant data from disaster with off-site backups to Azure Storage. This guide walks you through the complete setup—from creating an Azure Storage Account to configuring the Home Assistant integration—all for about 1 cent per month.

Backing up your data is important. Especially if it’s your Home Assistant instance running and orchestrating your home! And while local backups are nice, what if your Home Assistant machine decides to throw a tamper tantrum which results in data loss? Then you wish you’d have a Home Assistant backup somewhere else. Enter Home Assistant backups to Azure! 🚀
In this post you will learn how to set up Home Assistant backups to an Azure Storage Account. We are going to use the Azure Storage Home Assistant integration for this.
Azure Cost
Cloud services are said to be quite expensive. And to be honest, they CAN be. However, done right, this will cost you (next to) nothing.
For example, I use Azure to back up my Home Assistant instance (7 days retention, about 1.2GB of data) and pay a whopping 0.01€ (yes, 1 cent) per month for the storage. Not too bad in my opinion.
There are also some tricks like the 200$ free Azure credit you get when signing up fresh you can use, to make this basically free of charge. I won’t get into that right now however.
Pro tip: Use the Azure Pricing Calculator to get an idea of Azure Cost beforehand.
Azure Setup
First up, you will need an Azure Subscription. I won’t get into detail on how to set one up now. If you don’t have an Subscription, head here and set one up for free.
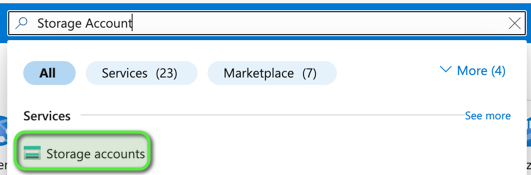
Once you’ve landed at the Azure Portal (https://portal.azure.com) start by creating a new storage account. Just search for “Storage Account” in the top search bar.
If you don’t have an storage account yet, you will be prompted to create one.
Once you’ve reached the Create a storage account wizard, these are the important settings to change. Everything else can be kept at default:
Basics
- Subscription: Choose your subscription (most likely you will have only one)
- Resource group: Press Create new and give it a fitting name (e.g. “hass-backups”)
- Storage account name: A globally unique name. This can be just a random sequence of letters and digits, doesn’t really matter. 🚨 Take note of this name, as we will need it later!
- Region: Choose the one closest to you
- Redundancy: Locally-redundant storage (LRS)
You can choose higher redundancy tiers to protect your data even more (e.g. if an entire Azure region fails). I think LRS is more than enough for our use case however.
Advanced
- Access tier: Cool
Once you’ve entered these settings, finish by creating the storage account and waiting for the wizard and deployment to finish.
🎉 You’ve just created your Azure storage account!
As soon as the deployment finishes, click the Go to resource button to switch to your newly created storage account.
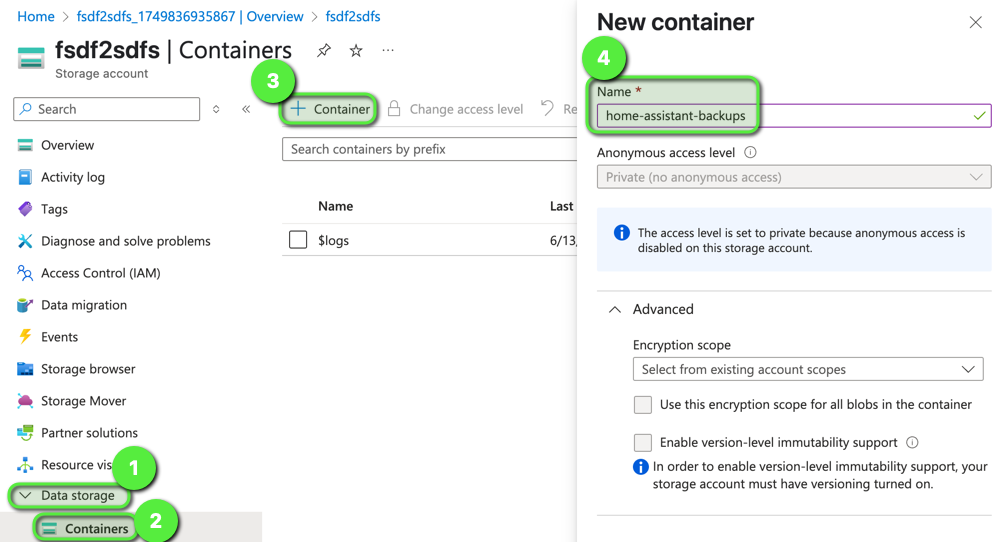
Now we will have to create an blob container which will hold our backups. To do so, head to Data Storage > Containers like shown in the screenshot. You can name the container however you like. 🚨 Take note of this name, as we will need it later!
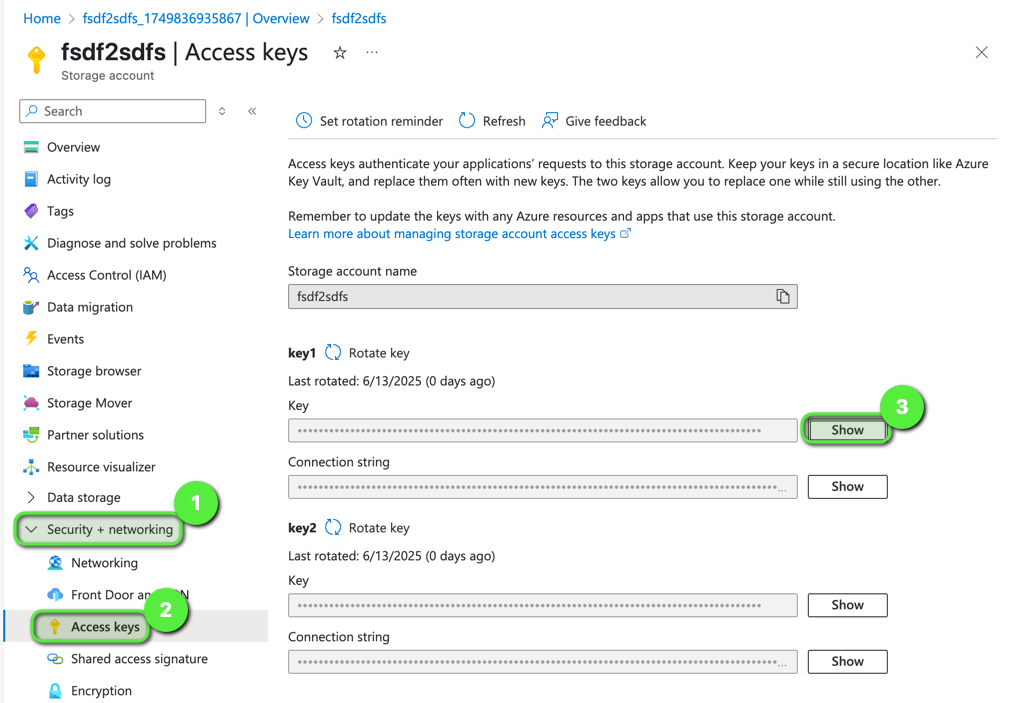
Now we are almost done, we just need one more information. Head to Security + networking > Access keys. 🚨 Take note of one of the keys, as we will need it later! These keys essentially are passwords (kind of) which Home Assistant will need to authenticate against the Storage Account.
By now you should have three things ready to go:
- Storage Account name
- Container name
- Storage Account key
Once you’ve got all of those, you can move on to the Home Assistant part.
Home Assistant Setup
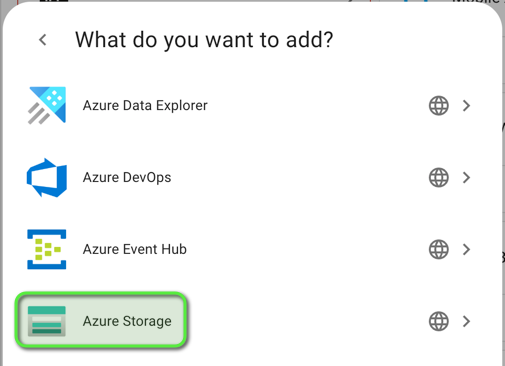
In Home Assistant, start by adding a new integration.
Search for Microsoft, select it and then choose Azure Storage.
Upon selection, you will be prompted to enter the Azure Storage Account information you have noted earlier. Enter the data and confirm with Submit.
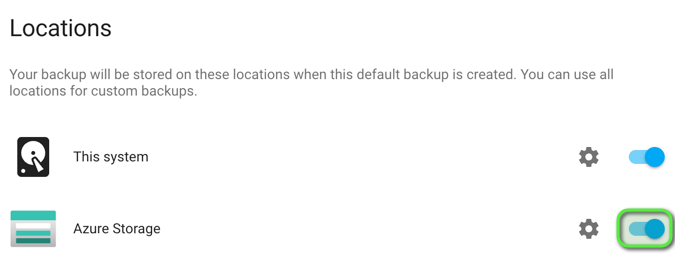
Now head to Settings > System > Backups. Once arrived, click Store in Azure Storage at the bottom of the page.

The last thing now is to enable the toggle next to Azure Storage.
🎉 You just configured Home Assistant to save backups to Azure Storage!
Downloading backup files
Now that we’ve configured backups to Azure, let’s also briefly cover how to get to them, should you ever need them (let’s hope you never will …).
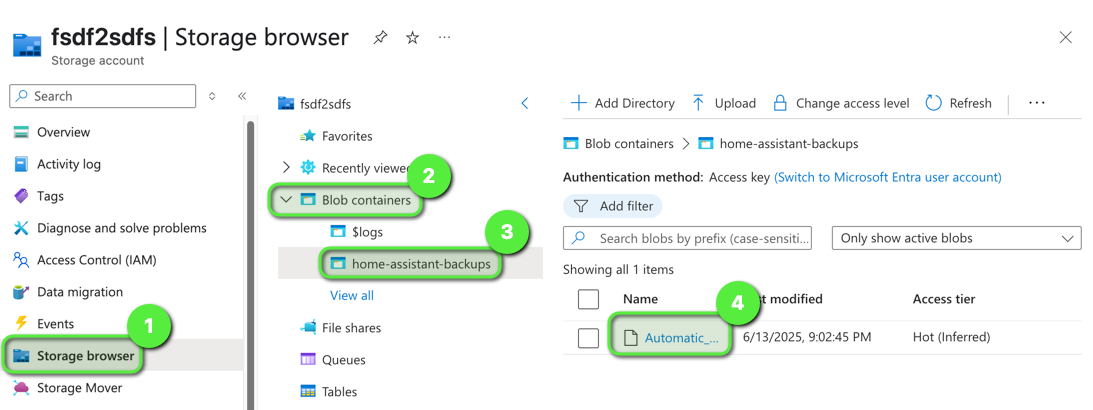
Head back to the Azure Portal (https://portal.azure.com) and navigate to your Storage Account. It should be right on the home page unter recent resources. Once there, click on Storage browser > Blob containers > <Your container name>. There you should see your backup file. Click on it and you should have an Download button at the top.
Extra
One extra I wanted to include is the Storage Account firewall. By default, anyone from anywhere can access your Storage Account (providing they have the name and access key of course).
Should you be so lucky to have a static public IP address, you can configure Storage Accounts to only allow access from your specific IP address, increasing security by a lot.
To do so, head to your Storage Account in Azure. Now navigate to Security + networking > Networking. Click the radio button to select “Enabled from selected virtual networks and IP addresses”, then add your public IP by clicking the checkbox. Now all you need to do is hit Save to apply your changes.

Bye
I hope this post was helpful to you. I always appreciate feedback! Until next time! 👋