NVIDIA Jetson Orin Nano: Getting Started with YOLO
A beginner's guide to running YOLO on the NVIDIA Jetson Orin Nano. Covers setup challenges, camera streaming in Jupyter, and hands-on examples of object detection, segmentation, classification, and pose estimation.

Getting started with YOLO on the NVIDIA Jetson Orin Nano can be challenging but rewarding. In this guide, I’ll walk you through my journey of implementing YOLO models on this powerful AI platform.
This continues my journey with the Jetson and also AI workloads. During this journey, I will take you along my learning experience about running AI workloads, and just “getting into AI” in general. I will be sharing my experiences, learnings, challenges I encountered, and everything in between. The first post started out with setup of the NVIDIA Jetson Orin Nano. You can find it here:
For this second post, I will share my first experiences with running AI models on the NVIDIA Jetson Orin Nano. I will also talk about my initial struggles getting started with AI workloads on the Jetson.. During this post I will explain a small experimentation project I set for myself to get started with vision workloads. This project can be seen as a starting point for getting into local AI vision tasks. It’s very basic, so expect “getting your feet wet” level of depth. The project will also serve as a starting point for getting into YOLO models and experiencing their capabilities. My goal was to get a good starting point for learning to implement basic YOLO use cases, but without any pre-built container images.
The struggle
Initially I struggled a lot to get a starting point for running local AI on NVIDIA Jetson hardware. When I first got the device, I decided to flash the most recent Linux for Tegra and Jetpack versions provided by NVIDIA. Because, why wouldn’t you?
Then I started to search for intro guides for entry level workloads on the Jetson. Eventually I found the Hello AI World Jetson-Inference GitHub repository by NVIDIA:
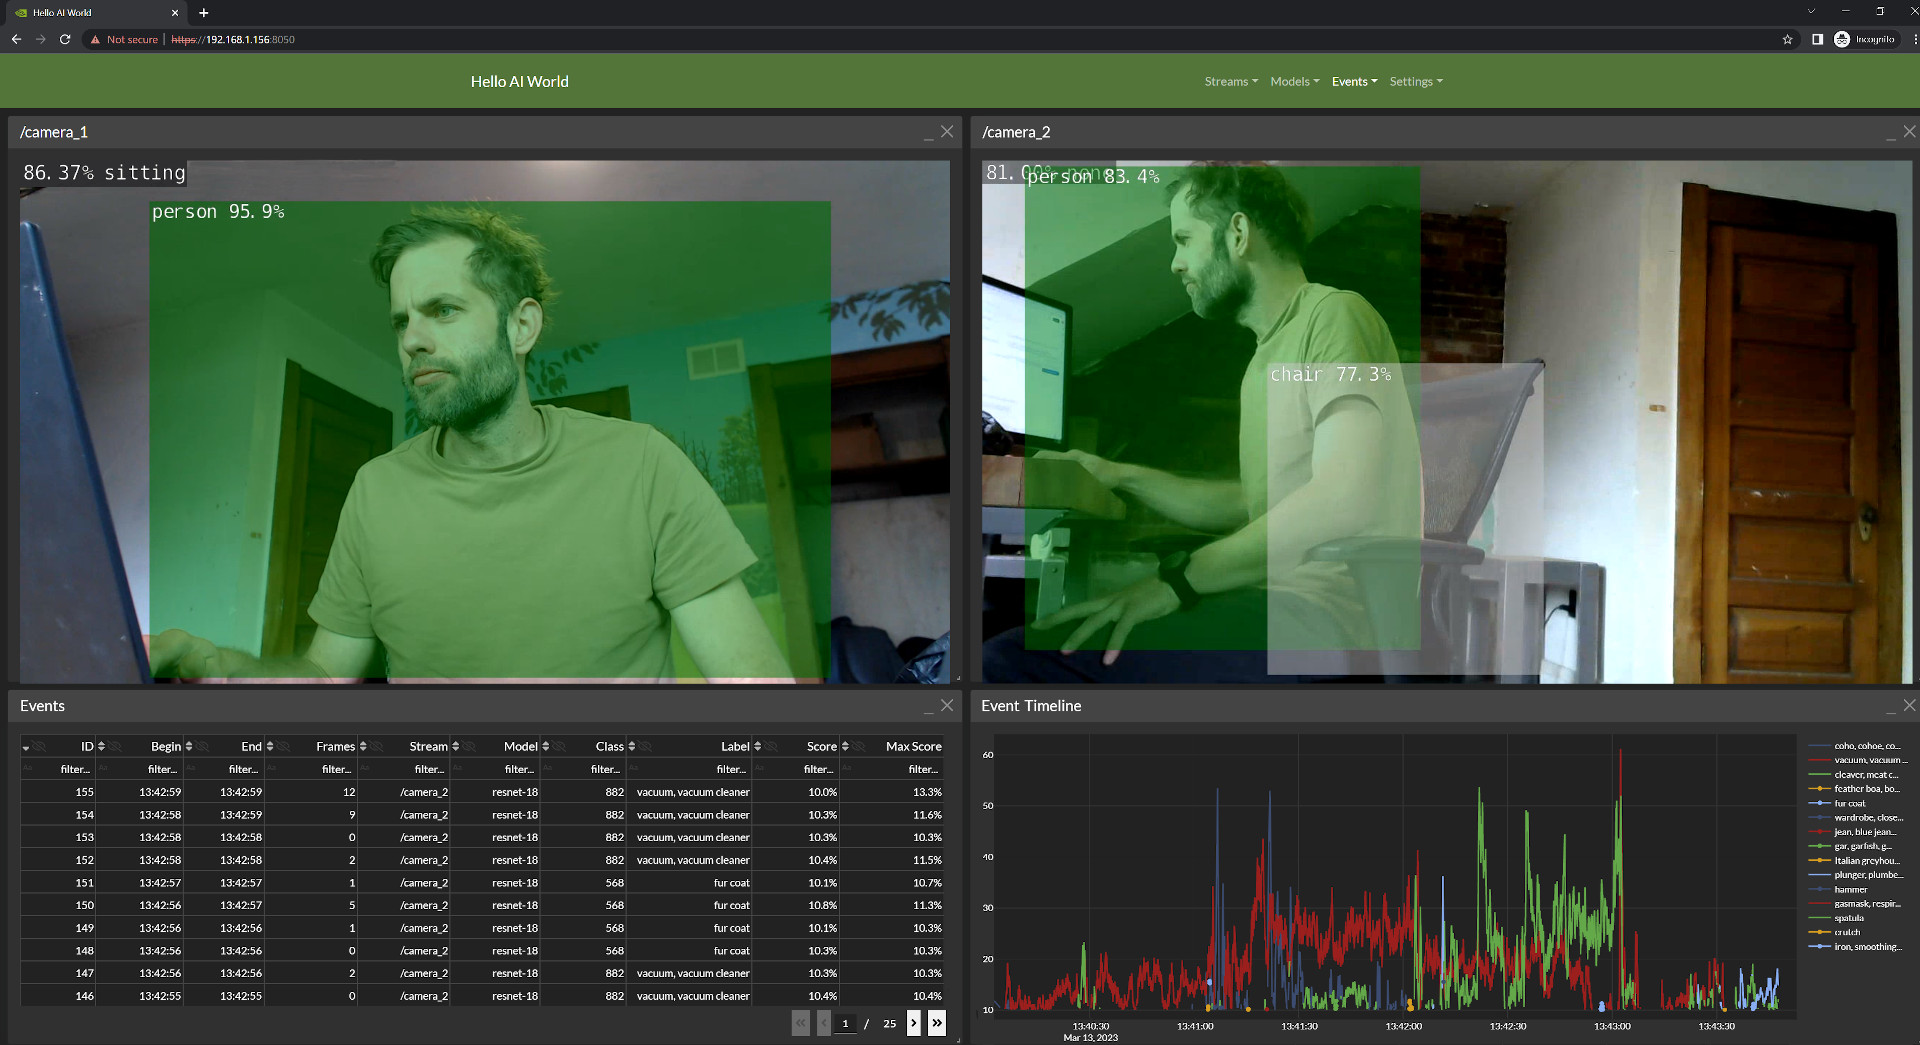
On first impression, this looked exactly like what I was looking for. A nicely guided way to get into AI on the NVIDIA Jetson platform, with a clear guide to follow. NVIDIA even provided additional Youtube guides in their “Jetson AI Fundamentals” series:
So I decided to follow this guide, but things fell apart very quickly. I decided to go within the route of building the project from source, and that’s where I started to run into problems. The build didn’t work properly, I started to run into errors. I got those sorted out eventually, but when I tried to run the first image classification task, I ran into even more issues. After doing some research, the entire jetson.inference Python library and project seems to be no longer supported by NVIDIA. Because of this, Jetson Inference doesn’t work with newer versions of Jetpack anymore. So I had two options. Either downgrade the Jetson and learn an already outdated library, or find an alternative.
Because learning outdated stuff didn’t make sense to me, I decided to search for alternatives. I of course found NVIDIAs Jetson AI Lab website (https://www.jetson-ai-lab.com/). After I did some looking around, I noticed that everything on there is just focused around running Docker containers. While this can be useful, it wasn’t a good way to start learning (at least for me). I want to use AI directly in my own projects and learn, not just run Docker containers. The entire Jetson AI Lab very much gave me more “look at all the flashy things we can do” vibes, instead of being an actual resource to learn.
Sadly I did not find any other good learning resource, so that’s where I came up with my own little project to get things going.
What is YOLO?
YOLO (”You only look once”) is a framework for real time object detection in images and videos. It gets it’s name from the fact that the neural network processes entire images in one pass, compared to other methods which require many passed for one image. With version 1 being released in 2015, the model kept evolving and improving. Currently the model is available in version 11.
There are many tasks which can be performed by YOLO. I will get into them in more detail later in this post, but just to name them:
- Object detection
- Image segmentation
- Classification
- Pose estimation
- Oriented bounding box detection
I chose YOLO for a couple of reasons. First, I’ve always heard and read about YOLO in the context of vision models and object detection, so I just wanted to try it out and get a feel for it. Ultralytics also offer a nice and easy to use integration in Python, so this was a good starting point for me. I don’t have any experience with using AI models in projects yet, so this gave a good starting point which didn’t feel too overwhelming.
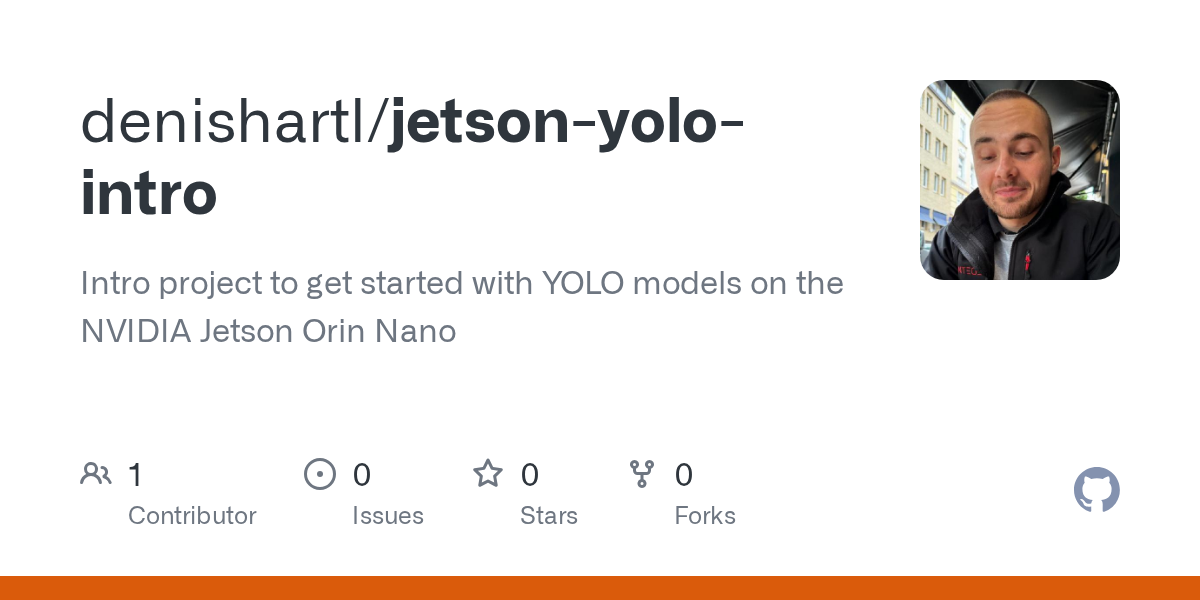
Getting Started with YOLO: The Jetson-YOLO-Intro Project
I came up with the Jetson-YOLO-Intro project to give myself a starting point and clear goal for my first steps with YOLO on the Jetson. I wanted to keep the scope clear and not too big, keeping the complexity low for this starting project.
To start, I set myself a clear goal: Run every task the YOLO model supports on a live camera feed from the Jetson and see how the model works.
You can find my repository here:
With that clear goal in mind, let’s get into the project 🔥.
Prerequisites
💡 These instructions can also be found within the Jupyter notebook I used throughout this project: https://github.com/denishartl/jetson-yolo-intro/blob/main/jetson-yolo-intro.ipynb
The following instructions assume that the project is ran on a NVIDIA Jetson Orin Nano with a CSI camera connected. For other platforms and devices, these instructions may differ.
The first step would be to install CUDA and cuDNN. But these come pre-installed as part of NVIDIA Jetpack, so there is no need to manually install those.
💡 CUDA and cuDNN
CUDA is NVIDIAs computing platform and API which allows software to use the parallel processing capabilities of NVIDIA GPUs for non-graphical workloads. cuDNN expands CUDA and is a dedicated deep neural network library for using GPU power for deep learning.
Start by installing required Python system packages. I will explain why OpenCV is installed as a system package in the section “Camera setup”.
sudo apt update
sudo apt install python3-venv python3-pip python3-opencv
Clone the GitHub repository and switch into it:
git clone git@github.com:denishartl/jetson-yolo-intro.git
cd jetson-yolo-intro
Create a virtual environment for Python with –system-site-packages to ensure we can use the OpenCV package:
python3 -m venv <venv-path> --system-site-packages
source <venv-path>/bin/activate
Install required Python packages:
pip3 install torch torchvision --index-url=https://pypi.jetson-ai-lab.io/jp6/cu126
pip3 install -r requirements.txt
pip3 install ultralytics --no-deps # Install ultralytics without dependencies, can't be done through requirements.txt
Verify Pytorch is installed and working:
import torch
print(torch.__version__)
print(torch.cuda.is_available())  # Should print True
Now the Jupyter notebook can be opened in VS code. You will be prompted to choose an Python interpreter on first use. Select the virtual environment you just created.
Camera setup
My goal was to view the live output of the camera (annotated by the outputs from YOLO later on) within the Jupyter notebook. Getting this to work was a little tricky however.
First I had to solve some compatibility issues. To make the camera streaming work, we need OpenCV with GSTREAMER support. Only the system package of OpenCV supports this. However, the ultralytics Python package would install the Python package of OpenCV and Numpy in version 2. The Python package of OpenCV doesn’t support GSTREAMER, breaking camera streaming within Jupyter notebook. In addition, the system package of OpenCV requires Numpy in version 1.
Because of this, ultralytics needs to be installed with --no-deps and the system package of OpenCV and other Python packages need to be installed manually.
With these annoyances out of the way, I was able to make camera streaming within the Jupyter notebook work.
# Prepare gsteamer pipeline for Jetson camera
def gstreamer_pipeline(
capture_width=640,
capture_height=480,
framerate=30,
flip_method=2,
):
return (
"nvarguscamerasrc ! "
"video/x-raw(memory:NVMM), "
"width=(int)%d, height=(int)%d, "
"format=(string)NV12, framerate=(fraction)%d/1 ! "
"nvvidconv flip-method=%d ! "
"video/x-raw, width=(int)%d, height=(int)%d, format=(string)BGRx ! "
"videoconvert ! "
"video/x-raw, format=(string)BGR ! appsink"
% (capture_width, capture_height, framerate, flip_method, capture_width, capture_height)
)
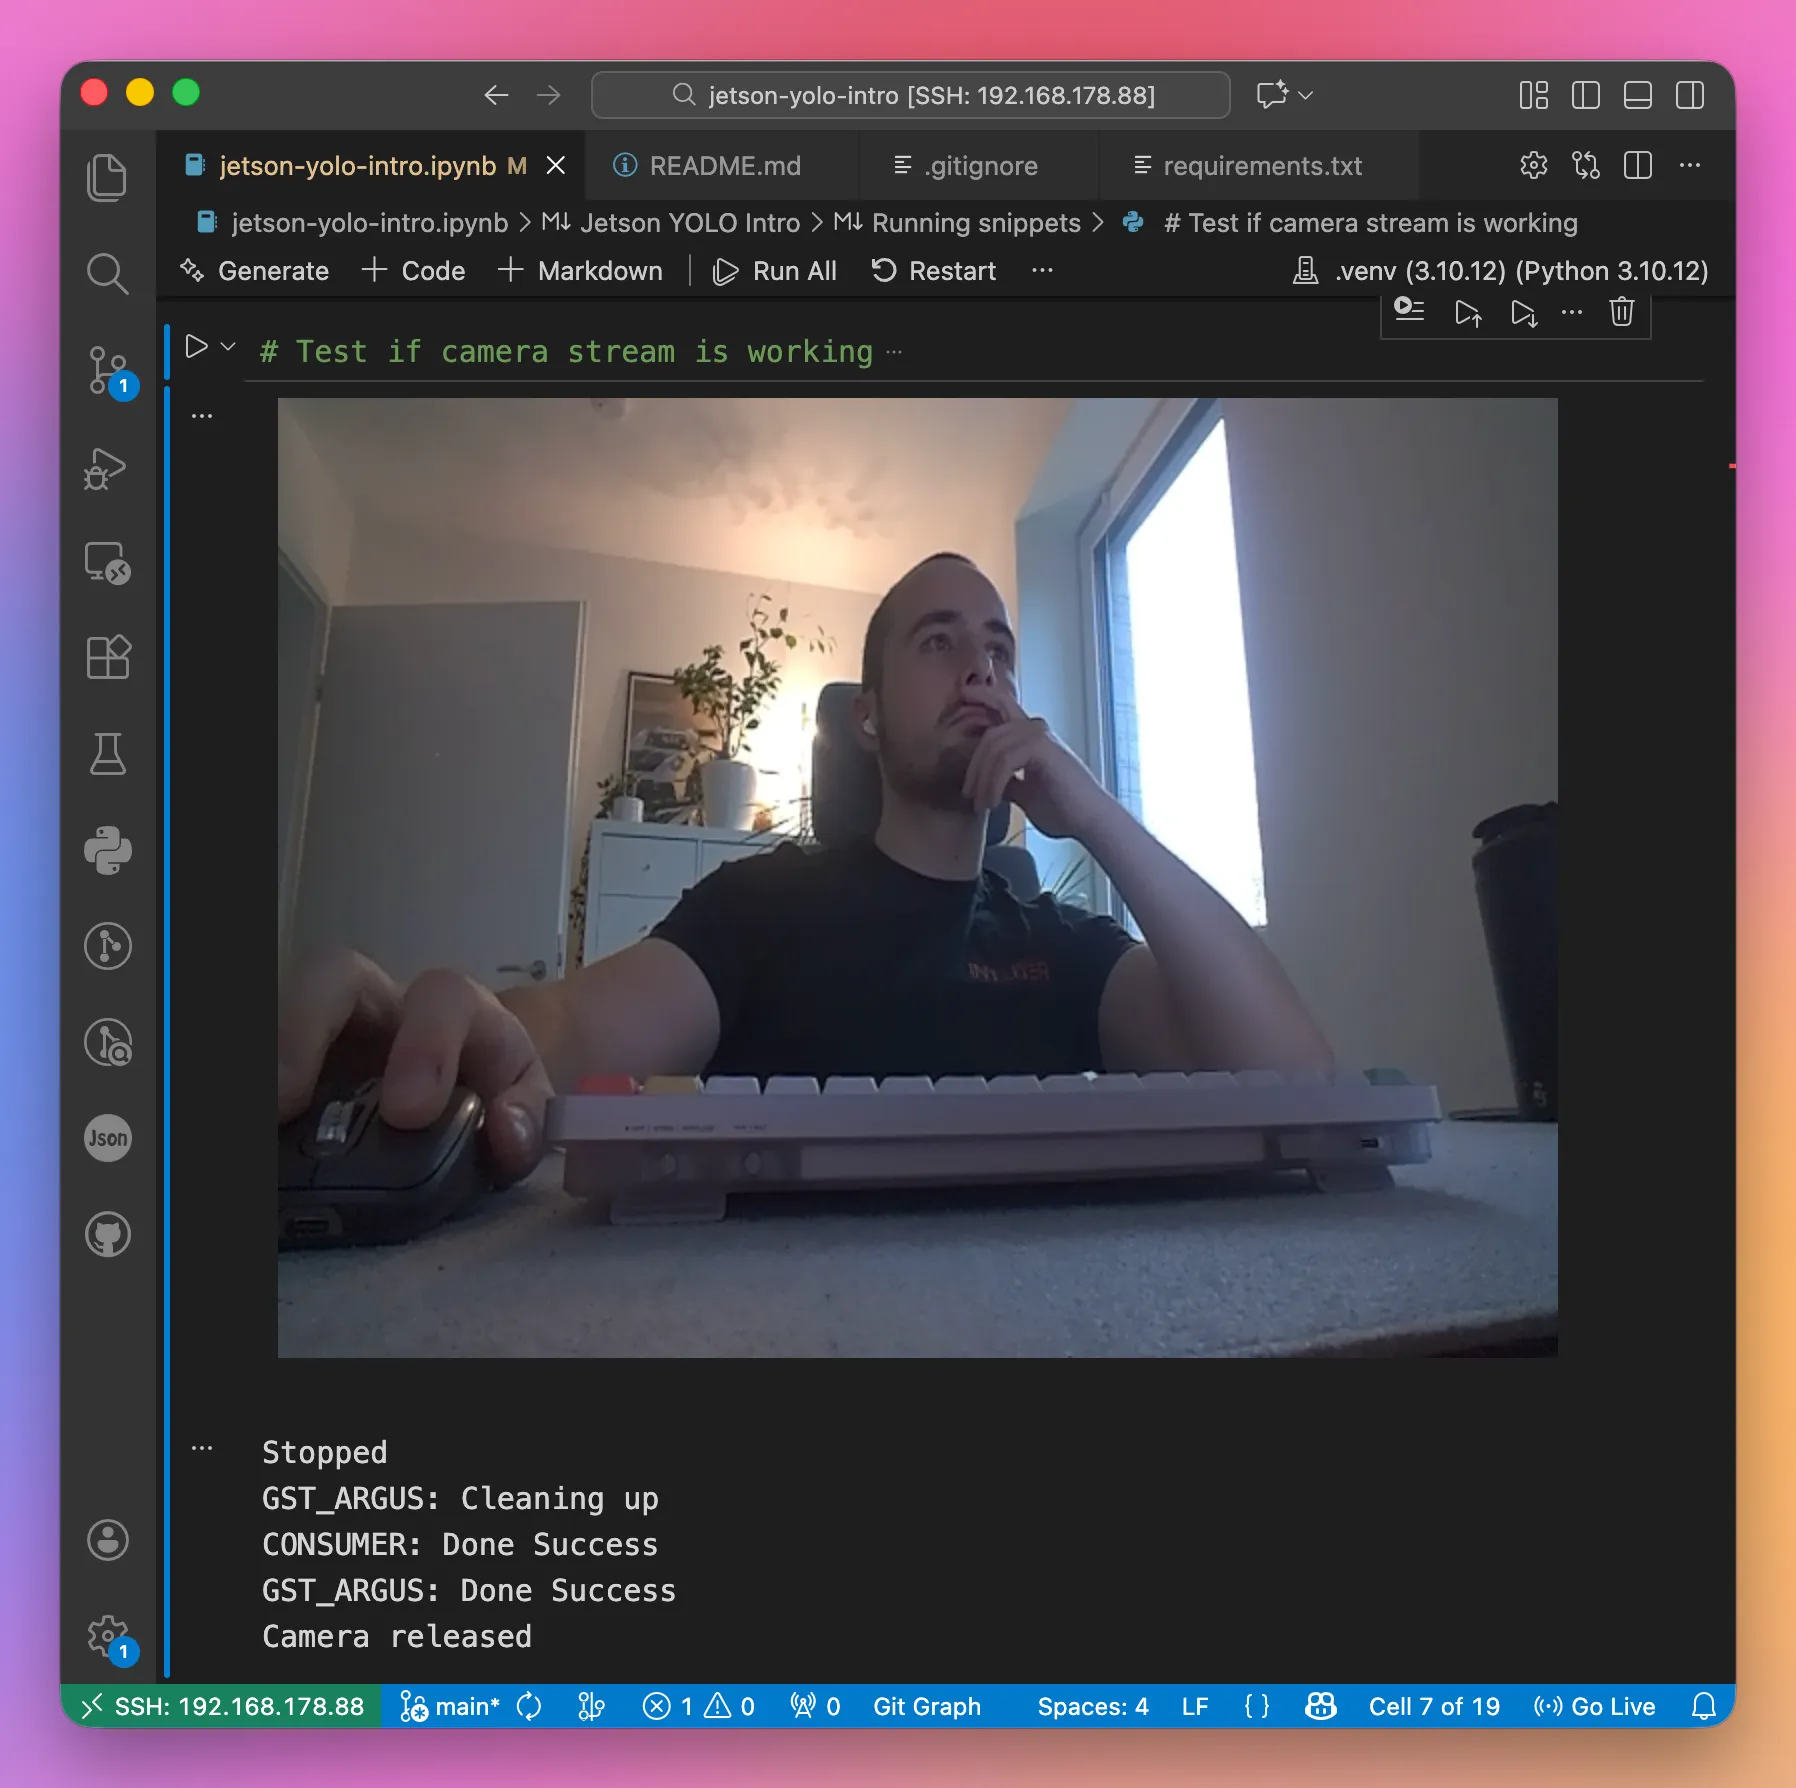
# Test if camera stream is working
cap = cv2.VideoCapture(gstreamer_pipeline(), cv2.CAP_GSTREAMER)
if not cap.isOpened():
print("ERROR: Could not open camera")
else:
print("Camera opened! Streaming... (stop with the stop button)")
try:
while True:
ret, frame = cap.read()
if not ret:
print("Failed to read frame")
break
_, jpeg = cv2.imencode('.jpg', frame)
clear_output(wait=True)
display(Image(data=jpeg.tobytes()))
time.sleep(0.05)
except KeyboardInterrupt:
print("Stopped")
finally:
cap.release()
YOLO vision tasks
With all of the prerequisites out of the way, playing around with YOLO can finally begin.
The nice thing about the Ultralytics YOLO implementation in Python is, that (at least for the very basic use cases in this example), the same code can be used to call different models for different tasks. So I wrapped the entire model call into one function.
def run_model(model):
    cap = cv2.VideoCapture(gstreamer_pipeline(), cv2.CAP_GSTREAMER)

    # Prepare for FPS calculation
    freq = cv2.getTickFrequency()

    try:
        while True:
            # Get start tick for FPS calculation
            t1 = cv2.getTickCount()

            # Read frame
            ret, frame = cap.read()
            if not ret:
                break

            # Run detection
            results = model(frame, verbose=False)
            annotated = results[0].plot()

            # Add FPS to frame
            t2 = cv2.getTickCount()
            time1 = (t2-t1)/freq
            frame_rate_calc = 1/time1
            annotated_with_fps = cv2.putText(annotated, # Image to draw text on
                                            f'FPS: {frame_rate_calc:.2f}', # Text to display
                                            (5, 470), # Position (bottom-left corner)
                                            cv2.FONT_HERSHEY_SIMPLEX, # Font
                                            0.5, # Font scale
                                            (255, 0, 0), # Font color
                                            1, # Font weight (thickness)
                                            cv2.LINE_AA) # Line type

            # Convert to JPEG bytes for display
            _, jpeg = cv2.imencode('.jpg', annotated_with_fps)

            # Display in notebook
            clear_output(wait=True)

            display(Image(data=jpeg.tobytes()))

    except KeyboardInterrupt:
        pass
    finally:
        cap.release()
I also added an FPS counter to get an indication of performance and I wanted to know.
Object Detection
Object detection is the primary task supported by YOLO. It is used to identify objects within an image or video frame. Detected objects are highlighted by bounding boxed, indicating the class label and the confidence level of the models prediction.
Using the helper function, it’s very simple to call the model:
model = YOLO("models/yolo11x.pt")
run_model(model)
The output then gets displayed directly within the Jupyter notebook. All objects detected by YOLO get highlighted with a bounding box and their labels.
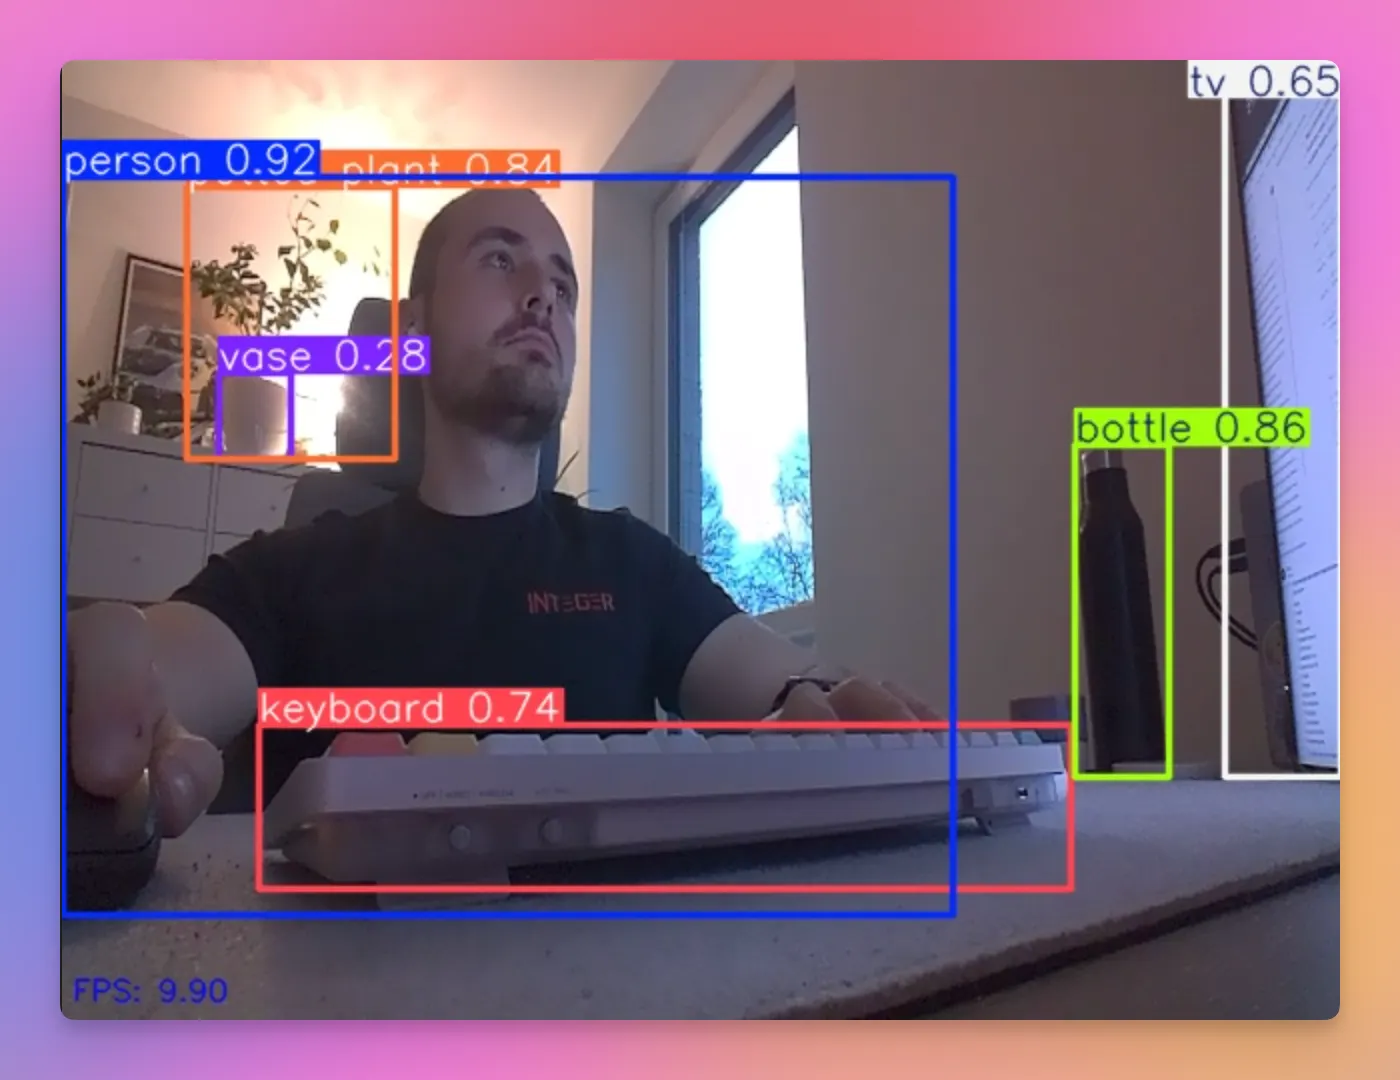
Here are some real world use cases for object detection:
- Agriculture: Automated sprayer systems that detect weeds and allow targeted spot-treatment
- Environmental monitoring: Automated detection of fire or smoke in forests to detect wildfires
Image Segmentation
Image segmentation expands on object detection by adding pixel-level masks for each detected object. This allows for a more detailed understanding of the scene, as each pixel is classified as belonging to a specific object or the background.
model = YOLO("models/yolo11m-seg.pt")
run_model(model)
Here is an example of image segmentation in action.
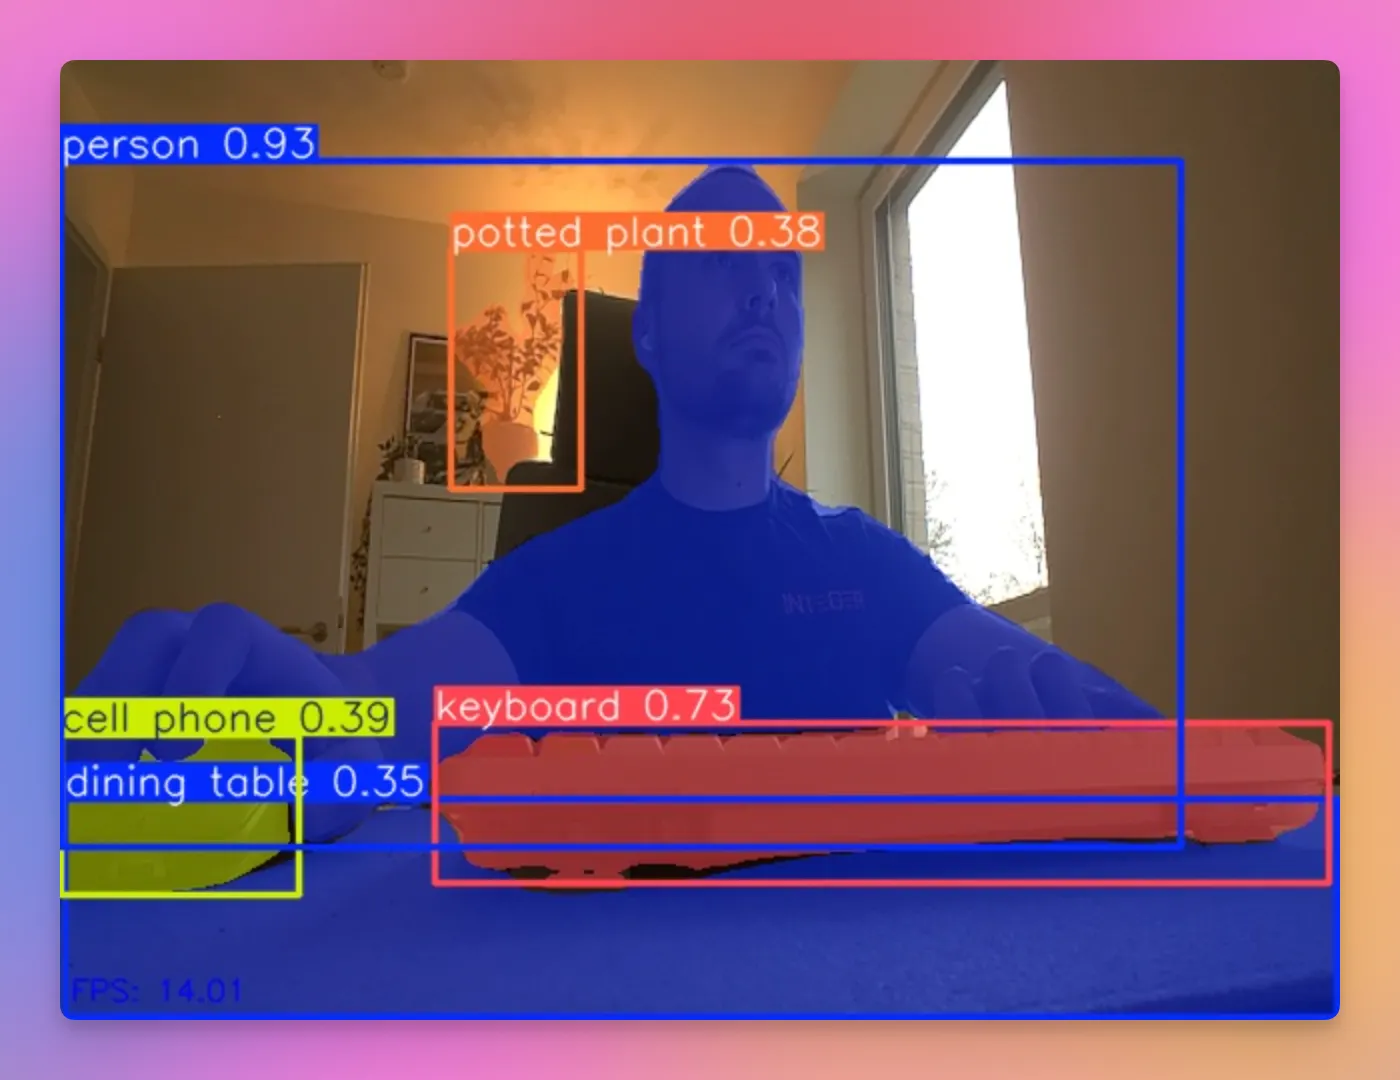
A real world use case for image segmentation is autonomous driving. Here image segmentation is used to identify drivable area or the current lane a car needs to stay in.
Classification
Classification tries to categorize an image based on the content within the image. It doesn’t try to identify individual objects and their classes within an object, but rather an image as a whole.
model = YOLO("models/yolo11m-cls.pt")
run_model(model)
The top left shows the classes which the model thinks describe the scene best, together with it’s confidence score for each.
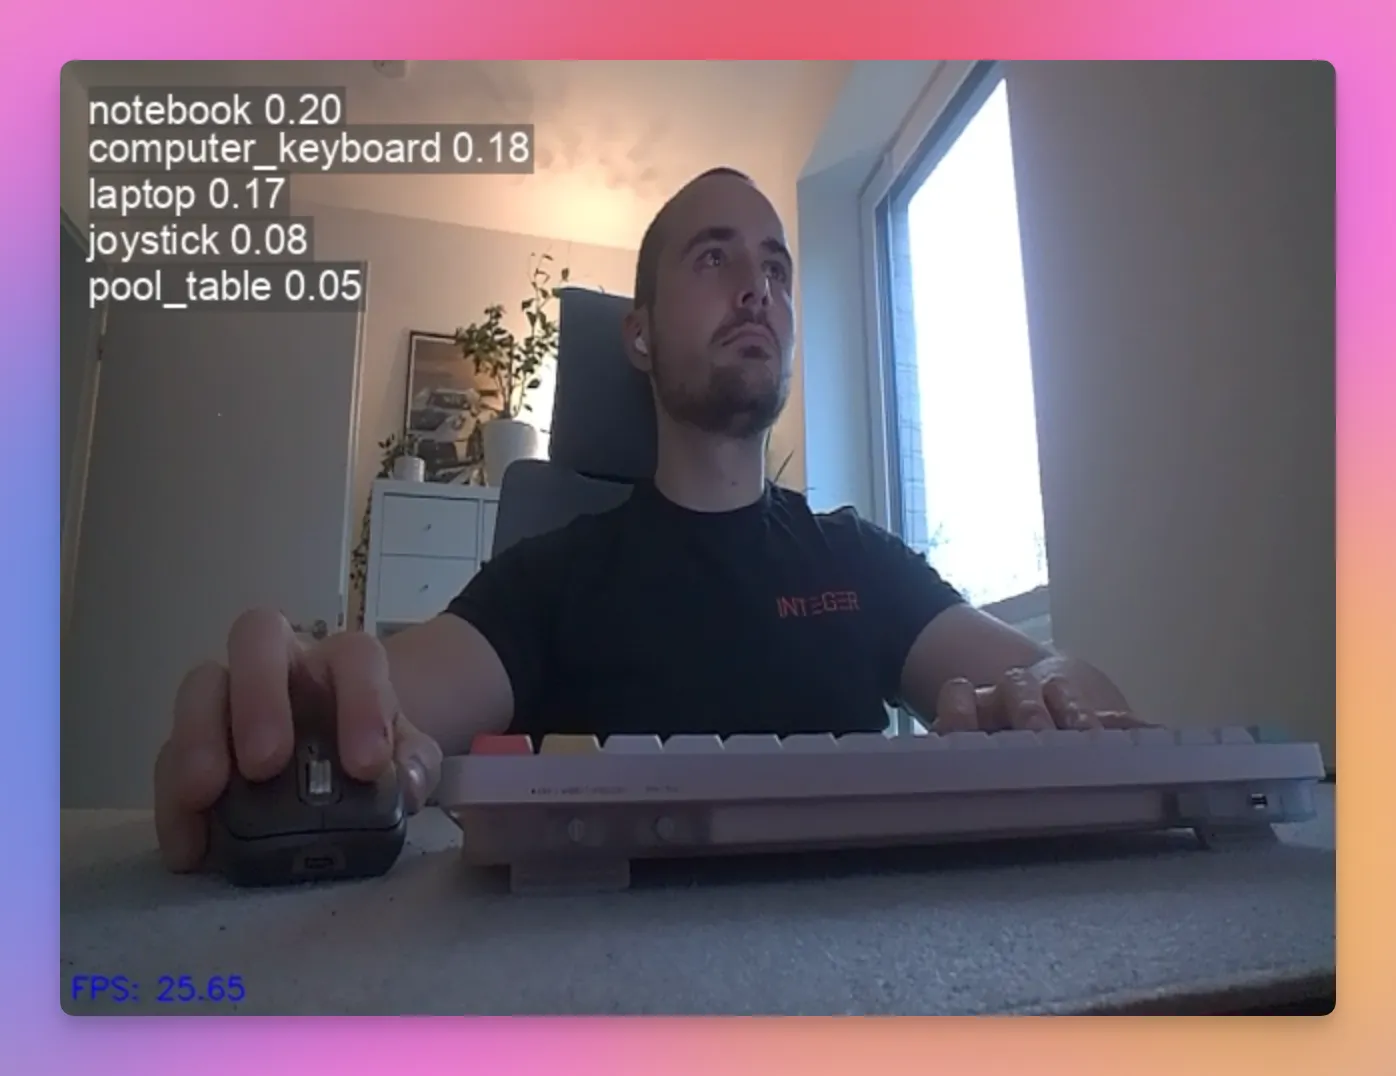
Real world use cases can be anything where the whole image needs to be evaluated as one. E.g. pass/fail classification in production lines or product image categorization.
Pose estimation
Pose estimation tries to detect and track specific keypoints of an human body with the goal of understanding a persons movement or posture.
model = YOLO("models/yolo11s-pose.pt")
run_model(model)
The model detects the key points within the human body and connects them.
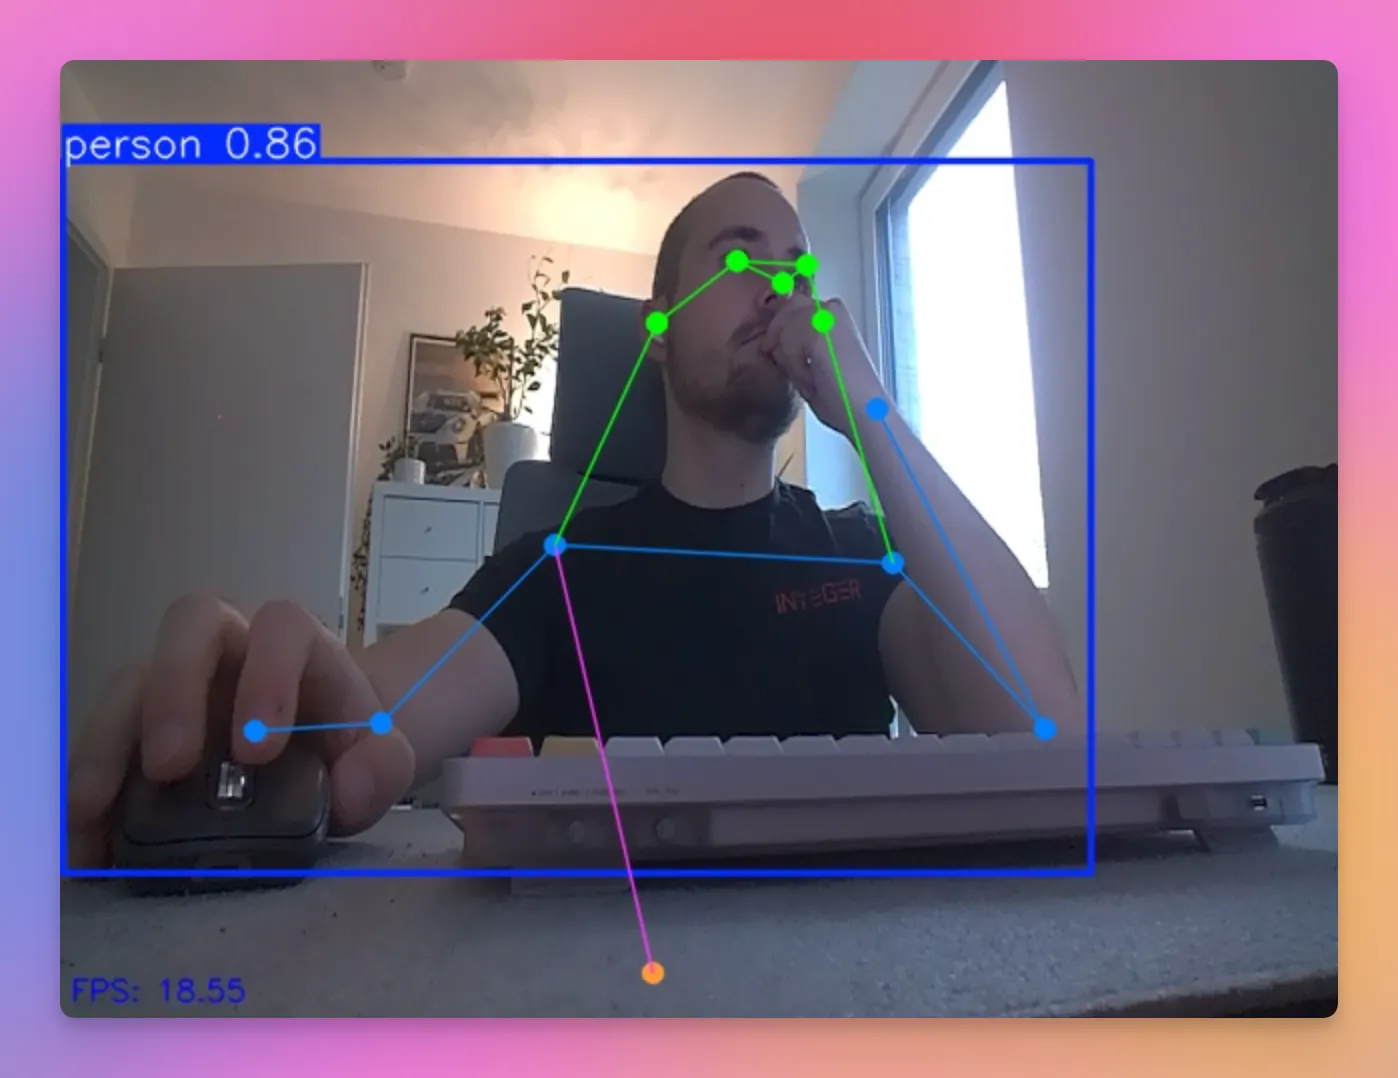
Posture detection can for example be used in medical use cases such as physiotherapy, where movement patterns of patients can be evaluated in real time. Another example is motion capture in the entertainment industry.
In my first post about getting started with the NVIDIA Jetson (https://denishartl.com/2025/12/16/nvidia-jetson-orin-nano-first-impressions-initial-setup/), I mentioned detecting when I slouch in my chair as something I wanted to build, so I think pose estimation will be very helpful here.
Oriented Bounding Box Object Detection
Oriented bounding box (OBB) object detection expands on basic object detection by including the angle of an object. For example, it could identify the direction in which a car is moving.
model = YOLO("models/yolo11n-obb.pt")
run_model(model)
During my testing I found that the model only detects very random things. This is probably because it was only pretrained on objects of these classes:
0: plane
1: ship
2: storage tank
3: baseball diamond
4: tennis court
5: basketball court
6: ground track field
7: harbor
8: bridge
9: large vehicle
10: small vehicle
11: helicopter
12: roundabout
13: soccer ball field
14: swimming pool
Because these classes are all the model knows by default, it makes sense that the detection in my case isn’t accurate at all. I can assure you that there actually wasn’t a ship on my chest 🚢.
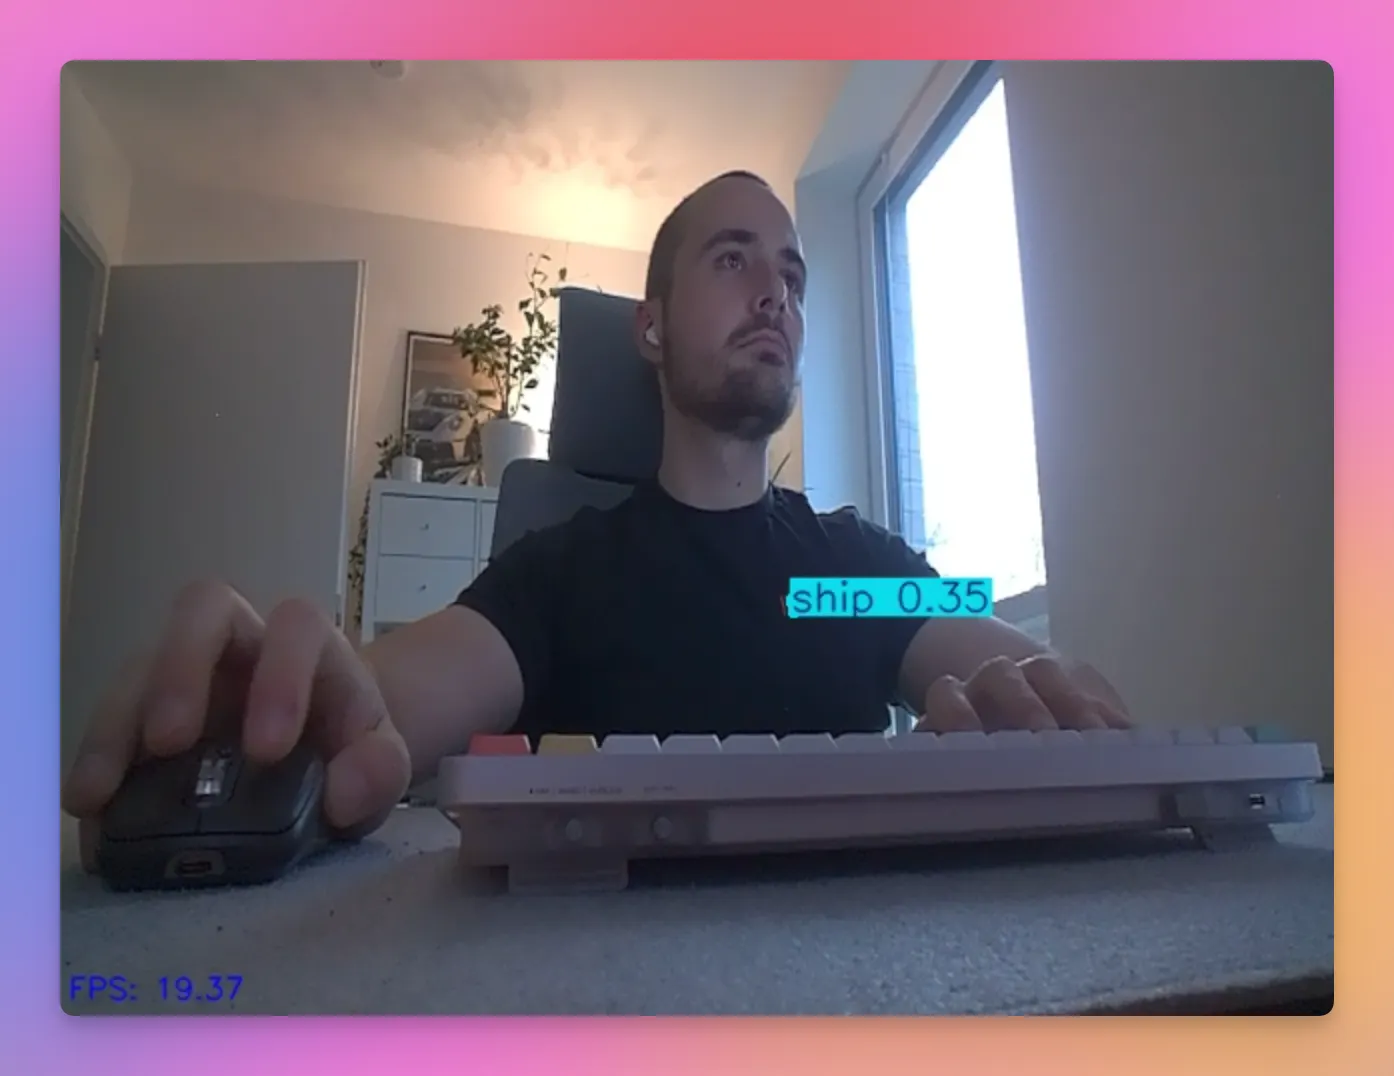
An example where oriented bounding box models are used is within environmental and traffic monitoring. Objects can be pretty small and many of them (think about a camera monitoring a highway), so the oriented bounding boxes enable higher precision by orienting the bounding boxes accurately to individual car’s orientations and directions.
Bye
While this learning path started out with struggles and frustration, it felt very rewarding and fun to finally get going and see some results. There is just something about having these AI workloads run directly on your desk which feels very satisfying and really got me hooked for more.
I hope you found this post interesting. Maybe my project even helps you to get started yourself on your own Journey with the Jetson.
Here are some ideas for next steps:
- Try other object detection models (e.g. RF-DETR)
- Explore possibilities for performance improvements (e.g. through TensorRT)
Have you tried implementing YOLO on your own Jetson device? What challenges did you face? Share your experience in the comments! ❤️
Feedback is always very welcome. I appreciate any of your thoughts 🙏
If you like what you’ve read, I’d really appreciate it if you share this article 🔥
Until next time! 👋
Further reading
- My Jetson-Yolo-Intro GitHub Repository: https://github.com/denishartl/jetson-yolo-intro
- Ultralytics Website: https://docs.ultralytics.com/
- NVIDIA Jetson Inference Repository: https://github.com/dusty-nv/jetson-inference
- NVIDIA Jetson AI Lab: https://www.jetson-ai-lab.com/